

How To Animate Using Photoshop
In this tutorial, you lot are going to learn how to make a video animation in Photoshop.
Nosotros are going to make a jet wing across the screen.
At that place are 2 types of animation, frame based and video based. In this tutorial we will be doing video based. You don't need a video to brand the animation, merely nosotros will save it as a video.
This is the starting time file. It contains 3 layers. A background, a jet and the flame for the afterburner, chosen exhaust.
Nosotros are going to animate the jet from the top of the screen to the bottom. We want to turn off the afterburner, then 1/ii mode through, nosotros will turn on the afterburning and the jet will speed upwards. This challenge should be enough for you to acquire a lot of the animation tools in Photoshop.
If yous need more preceise details on any of the steps, please watch the video. You should watch it anyway to see the animation.

Stride one.
Open up the timeline Window>Timeline
Drag the layers to make them longer, we are dragging them out to the v second marking.

Pace two.
With both the Jet and exhaust layers selected, drag to the top of the screen and just off the screen equally the starting point for the animation.

Step 3.
Select the jet layer. We will breathing this outset.

Keyframes are how Photoshop does animations. a/ You set the first keyframe. b/ Move the playhead to a dissimilar point in time. c/ Alter the object on screen. Photoshop will breathing the changes over time, lets see…
Step 4. Using keyframes
Click the pointer to reveal the keyframes
Click on the stopwatch past Position to set the kickoff point for the jet

Step 5.
Move the playhead to the end of the timeline. This is where you want the animation to end.

Pace six.
Elevate the jet to the ending position.

A keyframe will be generated at the playhead at the end of the timeline.

Pace 7.
Press the spacebar of the play button in the timeline to preview the animation. The jet should be moving at a abiding speed.

Step 8.
We desire to also animate the flame behind the jet.
Move the playhead to the start position.
Cull the frazzle layer and click on the stopwatch for position.

Step ix.
Move the playhead to the end of the timeline.

Step x.
Elevate the frazzle into position.

Play information technology dorsum and now the jet and the flame should be moving together,


Step 11. Changing the speed of animations in Photoshop
Now we are going to change the speed. We want the jet to start off slowly and and then speed upwards at the terminate.
Move the playhead to the middle of the timeline (around 2.v seconds).
Click on the diamond between the 2 arrows to the left of the position stopwatch, this adds a keyframe

Step 12
Click on the exhaust layer
Click the diamond to add a keyframe on the frazzle layer

Footstep xiii
Click one of the keyframes to select it.
Hold downward shift and click the second keyframe to likewise select information technology.

Step 14
Drag the keyframe to the right. They will both move together because they are both selected.

If yous playback at present, the jet volition motion slowly, when it hits the second keyframe it will speed up. (Information technology's explained on the video why it does this)

Step xv.
At present, we want the flame to only announced when the jet speeds up, every bit the afterburner kicks in.
Motility the playhead back a single frame.

Pace xvi
In the exhaust layer, plow on the stopwatch for opacity

Step 17.
Turn the opacity to 0 on the frazzle layer

Step eighteen
Move the keyframe forwards ane frame.

Step 19
Prepare the opacity to 100

Now the flame will be hidden at the beginning of the animation

When it reaches the keyframes and the jet accelerates, the flame will turn on.

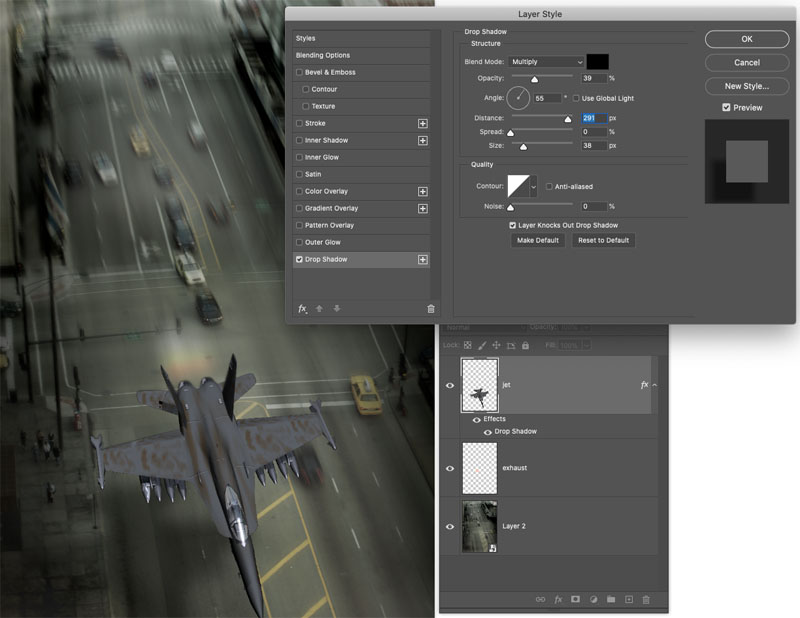
Step 20. Adding a moving shadow
Now we demand to add a shadow for realism and depth.
Choose the jet layer
Click the add a layer style push and choose drop shadow

Step 21
Add the setting as shown here

The shadow will motion with the jet
Step 22. Irresolute the shadow over fourth dimension
Let's change the shadow so that it looks similar the jet is climbing when the afterburner is on.
Move the playhead forwards to when the afterburner comes on. (where the speed changes)
On the jet layer, click the stopwatch to add a keyframe for style.

Step 23
Motion the playhead forward a little chip.

Step 24
Double click the drop shadow effects to open the effects.
Change the settings as shown hither. Make the shadow softer and more than transparent. Elevate the shadow farther abroad from the jet. (This makes it await like its getting further away.)
Now when y'all play information technology dorsum, the yet will move and the shadow will change over time
This makes it look like the jet is climbing. A trivial bit tin go a long way with animation.

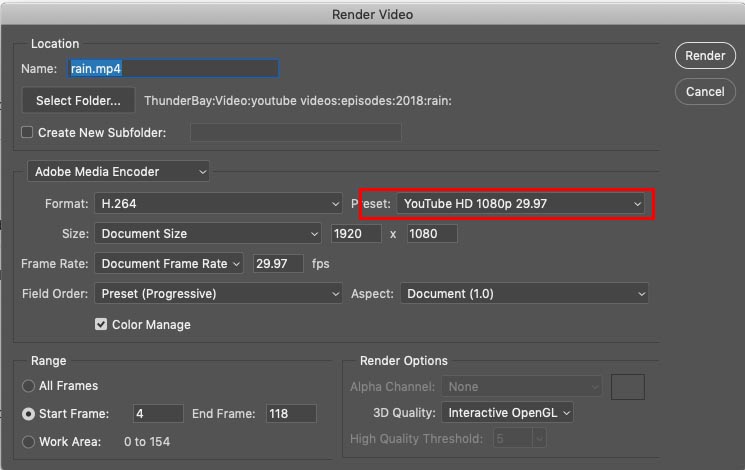
RENDERING THE VIDEO
Now nosotros take made the animation, we need to export it, so we tin can utilise it.
Choose Consign>Return Video.
Requite it a name
Choose the location to save the video
cull the presets and select the best ane for your video. Here i used youtube 1080 for a letter boxed version that will fit a Hd video
I have more Photoshop animation tutorials here
- Brand Blithe Rain
- Edit video in Photoshop
- Make Animated snow in Photoshop
- Brand an animated cartoon Cinemagraph
- Make a Cinemagraph gif
- Make Animated Star Wars Intro
If you lot want to learn more than about animation and working with video in Photoshop, check out the two premium courses I have. (They both work on CS6/CC/2020)
Video In Photoshop
Making Movies in Photoshop

How To Animate Using Photoshop,
Source: https://photoshopcafe.com/animate-photoshop-video-animation/
Posted by: jacksonprolifece.blogspot.com
0 Response to "How To Animate Using Photoshop"
Post a Comment